What Is Bubble Hair Damage?
Bubble hair is a type of hair damage caused by excessive heat, usually from blow dryers, flat irons, curling wands, or even hot water.
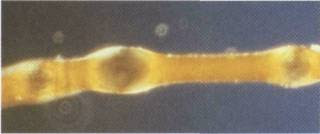
When hair is exposed to extreme heat while wet or damp, the water trapped inside the hair shaft turns into steam.
This creates tiny bubbles within the hair fiber, weakening the structure and making the strands more prone to breakage.
Table of Contents
Signs of Bubble Hair
- Brittleness – Hair feels dry and snaps easily.
- Uneven Texture – The affected strands may feel rough or bumpy.
- White Spots – Small, whitish or translucent spots may appear along the hair shaft.
- Breakage & Split Ends – Weakened hair is more likely to break, especially at the ends.
Causes of Bubble Hair
- Using heat tools on damp or wet hair – This is the primary cause.
- Overusing high heat settings – Regular exposure to extreme heat (above 400°F/200°C) weakens the hair.
- Lack of heat protectant – Heat styling without protection makes the hair more vulnerable.
- Frequent heat styling – Daily or excessive use of blow dryers, curling irons, and straighteners increases damage.
How to Prevent Bubble Hair
- Dry hair thoroughly before heat styling – Never use a flat iron or curling wand on damp hair.
- Use a heat protectant – A good heat protectant creates a barrier to reduce moisture loss and prevent bubbles.
- Lower the heat setting – Stay below 350°F (175°C) for fine hair and 375°F (190°C) for thicker hair.
- Limit heat styling – Reduce how often you use heat tools and opt for air-drying or heat-free styles when possible.
Can Bubble Hair Be Repaired?
Unfortunately, bubble hair damage is irreversible because the hair structure has been compromised.
The best option is to trim the affected sections and focus on preventing further damage with gentle hair care and reduced heat exposure.
In the vast landscape of hairstyling, where trends come and go, one style that has managed to stand the test of time is the captivating bubble hair style.
This playful and unique hairdo has captured the hearts of many, merging a touch of elegance with a dash of fun.
Whether you’re prepping for a casual day out or a special event, the bubble braid is a versatile choice that can be effortlessly adapted to suit various occasions.
So, let’s dive into the world of bubble braids, exploring their origin, how to achieve them, and some fantastic product suggestions to make your styling journey even more enchanting.
The Origin of the Bubble Hair Style

The bubble braid hairstyle, also known as the bubble hair style, traces its roots to ancient cultures where creative braiding techniques were a symbol of status, culture, and artistry.
Over time, these braids evolved and blended with modern trends to give birth to the bubble braid we adore today.
With its multi-dimensional appearance and visually captivating bubbles, this style has taken social media platforms and red carpets by storm, adorning the heads of celebrities and influencers alike.
Creating Bubbles in Hair: The Bubbles Hair Style
While the bubble braid may seem intricate at first glance, achieving this charming look is surprisingly simple and customizable, making it a perfect choice for individuals with varying hair lengths and textures.
Step 1: Prep Your Hair
Start with clean and dry hair.
Apply a small amount of texturizing spray or mousse to add volume and grip to your strands. This will help the bubbles hold their shape better.
Photo Credits: BeBeautiful.In